

Sometimes, you might like to use Google AdSense advertising on your Joomla site. The most obvious way of doing this is to take the HTML/Javascript code provided by AdSense and paste it into the Custom HTML module. However, this is not as flexible as I would like it. Also, if you want to change the appearance of the ad, you will have to create a new code in the AdSense account and do the pasting process all over again.
So, let's find an easier way to work with Joomla and Google Adsense.
If you paste Javascript and third-party HTML into the WYSIWYG editor you can experience other problems. The editor can strip out the AdSense code, or worse, alter it so it won't work.
I prefer using a Joomla extension to display the AdSense ads. My preferred extension for this purpose is the AdSense Module (ClickSafe - Special Edition). The extension has a lot of options and makes the it very easy to configure your ads.
AdSense module settings
To use the module, download and install it, then head on over to the 'Module Manager' of your Joomla Administrator:
- Click 'New' and Choose the 'Sponsored Links' module (I don't know or understand why they have chosen to use another name for the module here...).
- Choose and enter a name for the module (I normally use something like 'GAD 300x250')
- Choose not to show the title.
- Leave the module unpublished for now.
- Assign the module to a module position on your template (or leave it until you have decided on the size of the ad).
- The other, normal Joomla settings can be adjusted as you please. For instance, you may want to publish the module in certain sections in your site. For this, use the menu assignment options
Now you are ready for the module specific settings listed under 'Module Parameters'.
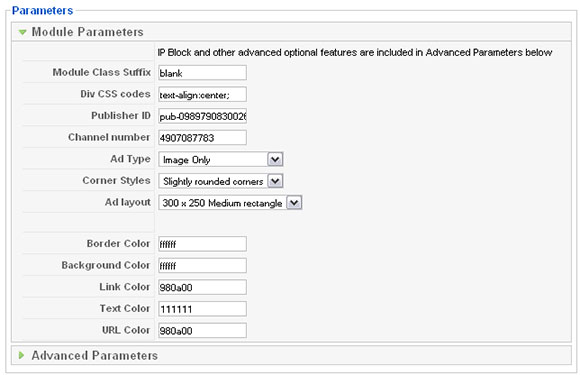
Module Class Suffix
If you are familiar with using Module Class Suffixes with Joomla templates, you can enter the suffix here. Most Joomla templates have a template suffix called 'blank' or '-blank' that you can use to remove any boxes or other module styling which appears in the standard template modules. You can also enter your own suffix and create the styling in your template stylesheet. I prefer using the 'blank' suffix myself and then use the following setting:
Div CSS codes
If you don't want to enter the styling info into the template CSS, you can enter some formatting code here. Examples can be:
text-align:center;
or
float:left;margin-left:10px;margin-bottom:10px;
This applies to the module DIV tag which surrounds the module content (the AdSense ads).
Publisher ID
Enter your publisher ID from Google AdSense. You will find this in the top right hand corner of Google AdSense when logged in.
Channel Number
If you have set up a channel for the ad (recommended), enter the channel number here. See below for more on AdSense channels.
Ad Type
This is where you choose what types of ads you want to have displayed. The choices are:
- Text and Image (default)
- Text only
- Image only
The recommended setting from Google AdSense is to have both Text and Image ads. However, there can be times when you want only one type of ads to display.
Corner Styles
This determines the style of the AdSense ad itself and has the following options:
- Square Corners
- Slightly Rounded Corners
- Very Rounded Corners
I never use the corners function, as I will explain below, so just leave it on whatever the default option is. The slightly rounded borders looks best, though (if you really want borders on your ads).
Ad Layout
This is where you choose the ad size and type. You need to make sure that the ads fit into the module position you have chosen. This is what the Google AdSense team says about ad sizes:
We've found that the medium rectangle (300 x 250), wide skyscraper (160 x 600), and the leaderboard (728 x 90) tend to perform best. You can also opt in to image ads to receive rich media and video ads, which tend to perform well too.
Choose the optimal ad colors
The following parameters have to do with what the text ads look like when they appear on your site. Experience has told me and a lot of bloggers that what works best is to choose colors that blend with the colors and style of your site template. That said, you're not allowed to trick the reader into clicking your ads, so don't be too creative ;) Again, here's a quote from the AdSense team:
It's important that you implement your ads in a consistent manner and in a way that is desirable to advertisers. Use colors effectively. Blend ads in, but not too much that users don't see them. Borderless ads tend to work well, as does highlighting the link and URL. Test different colors and placements, and then keep the changes that perform best.
Border color
I never use borders on my Google ads. You can not remove the border in any way. Thus, you'll have to apply the same color as your site background. For instance, if you have a site with a white background, chose 'FFFFFF' (white) as border color.
Background color
The same thing applies for the background color. Use the same as you chose for border color.
Link Color
Use the color you use for links elsewhere in your site.
Text Color
I normally go for black - or rather the code '111111', which is almost black.
URL Color
This is the color of the actual URL to your site in the ad. Normally, I would choose the same as Link color or a darker shade of the same.
There are also some Advanced Settings for this Extension, but let's get back to that in a later post.
Set up your Google AdSense channels
If you're serious about using AdSense, you need to measure to know how ads are performing and find the best placement. This is done through the use of AdSense channels. You set up channels in your AdSense account and link the ads to channels when creating them. In the AdSense module you can enter the channel number in a separate field (see above).
- Go to the AdSense Setup tab of your Google AdSense account
- Choose Channels
- Click 'Add new custom channels'
- Enter a name for the channel
- Click 'Add channel'
When you have your channels set up, you can see clearly how your ads are performing, as they appear in the reports separately.
Attract Advertisers with Ad Placements

Another benefit of using AdSense channels is attracting advertisers. When you create a channel you have the option of showing the ad to advertisers by using ad placements. Those advertisers may buy an exact placement on your site. This will most likely give you a higher yield per click, especially if several advertisers are competing for you particular placement.
- Go to the AdSense Setup tab of your Google AdSense account
- Choose Channels
- Find the channel you want to activate for Ad Placement
- Click on 'Edit settings' for the ad
- Tick the checkbox '
- Save the channel
This step may also be done when creating a channel, as you might have seen.
End note: Explore Google AdSense
Using AdSense with Joomla is very easy. Just make sure you review the advice on how to optimize your ad placement:
Also, you should check out the blog post Six ways to experiment with AdSense and increase your earnings, by Darren Rowse, the Problogger.
I sometimes use this module with the Joomla 'Content - Load Position' core plug-in to put the ads into the content of Joomla articles. I will show you how to this in a later post.
I hope this post was useful for you and wish you luck in increasing your AdSense revenue on your Joomla site :)