
According to Wikipedia, a content delivery network or content distribution network (CDN) is a system of computers containing copies of data, placed at various points in a network so as to maximize bandwidth for access to the data from clients throughout the network. A client accesses a copy of the data near to the client, as opposed to all clients accessing the same central server, so as to avoid bottleneck near that server.
Content types include web objects, download-able objects (media files, software, documents), applications, real time media streams, and other components of internet delivery (DNS, routes, and database queries).
There are currently three main CDN extensions available for Joomla, and I've just installed one on this site. I'm happy with the result - I hope you notice the difference in speed! In this post, I'll look at what CDN is, take a look at two different CDN extensions for Joomla and how to set up CDN using jomCDN from corephp.
What is a CDN?
CDN is a Content Delivery Network of highly-optimized servers all around the world working together to distribute your content (CSS and Javascript files, downloadable objects, applications, real-time media streams, and much more) through hundreds of servers instead of a single host. This "smart route" technology makes sure each visitor to your site gets their data from the city closest to them.

Who Needs CDN?
Small or large, if you're looking to grow your business online, CDN is considered by many as a must-have. By bringing your content close to the user's connection point, CDN will provide your site with much faster load times, superior scalability, and guaranteed uptime. A faster loading site not only makes your visitors happy, it can also earn you a few extra points toward a higher ranking on the major search engines. Load time has become a significant factor in getting good search engine rankings during the last year.
Three types of CDN extensions for Joomla
Last week, we saw the release of two CDN extensions for Joomla in a single day. The way they work are quite different.
 jomCDN from corePHP.com
jomCDN is a plug-in which automatically compiles the assets (images, javascript files, css files, etc.), syncs them to Amazon servers and automatically relinks all your page content to the Amazon servers. The plug-in supports both Amaon S3 and Amazon Cloudfront.
See below for how to set up this extension.
Price: $29.95
Read more about jomCDN
 CDN for Joomla by nonumber.nl
This extension rewrites the URLs and uses an active CDN which automatically fetches static content from your server. This extension is created to use the MaxCDN service or other similar CDN services.
Price: The non-commercial version is free. The commercial license costs from €15.
Read more about CDN for Joomla
JA Amazon S3 Component for Joomla!
 According to the developer, It works on a simple principle of image upload and updating their location path on the fly. Once you upload your folder (images / files) to the Amazon S3, the plugin updates the location path of uploaded files and on client request, all uploaded files are requested from Amazon S3 and not from the site folders. This in turns save the server load and bandwidth at the same time loading is faster on the client end. Disable the plugin and your file links are back to normal.
The extension is a component with full-blown Amazon s3 explorer built in. You can update even a single file to s3. The next version is coming soon, featuring an exclude folders function.
Price: Included in the JoomlArt Club packages
Read more about JA Amazon S3 Component for Joomla!
As you can see, these plugins work in different ways. I chose the jomCDN extension, but you really have to take a look and see what fits your needs and style best.
How to set up CDN for Joomla by nonumber.nl
As much as I wanted to give you a detailed instruction on how to set it up, I'd rather direct you to this excellent instruction on how to set up CDN for Joomla :)
How to set up jomCDN from corePHP
1. Buy the jomCDN plugin
Click here to purchase the corePHP jomCDN plugin for Joomla.
2. Install the plugin
Install the plug-in using the Joomla administrator -> Extensions.
The plug-in will be available in the plug-in manager:
![]()
Don't activate the plug-in yet!
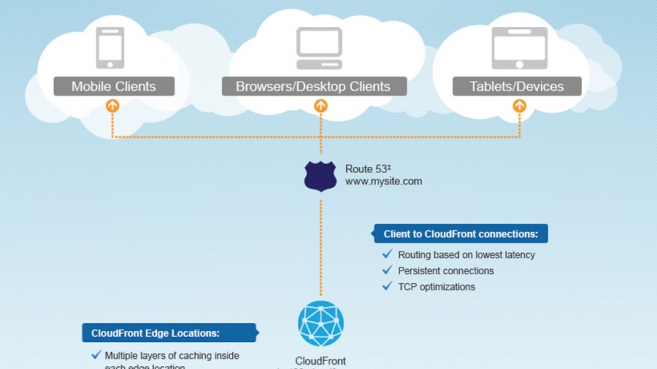
3. Sign up for Amazon S3 and Cloudfront
Before you start setting up the plug-in, you need to sign up for the services Amazon S3 and Amazon Cloudfront.
Your server must run PHP 5.2 or later.
4. Create a bucket in Amazon S3
Once you have created an account with Amazon S3, create a bucket through your AWS Management Console. You can create the bucket in any origin server you want. The developer recommends US – Standard or N. California.
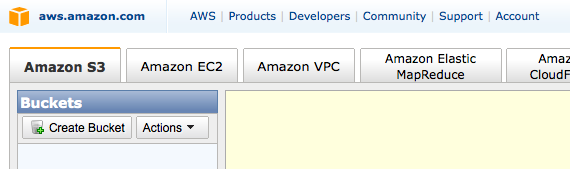
Clicking the 'Create bucket' button will open a new window:
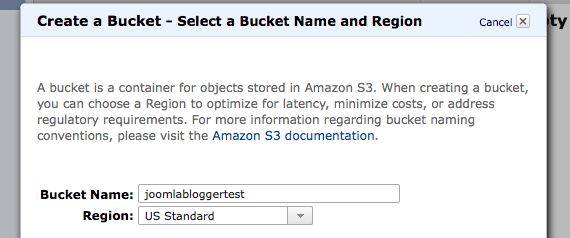
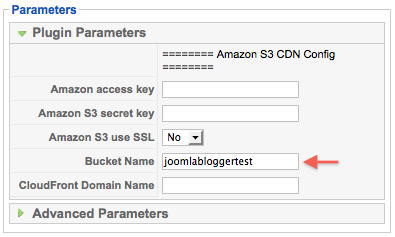
4. Insert bucket name
Once you have your bucket created, copy the name of the bucket to the plugin parameters on the right side.
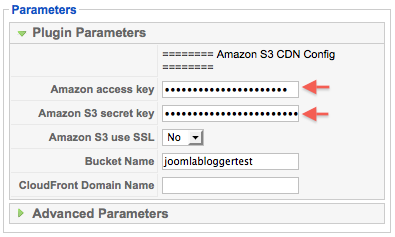
5. Insert Amazon credentials
Now we need your Amazon credentials. These are unique to your AWS account. You can get these from the Security Credentials page.
You will need your 'Access Key ID' and 'Secret Access Key.' Copy those Keys to the plugin parameters on the right.
6. Activate the plug-in
At this point you can start using this plug-in, although we HIGHLY recommend you set up Amazon CloudFront. Once again, instead of objectrequests taking 500-800ms depending on location, CloudFront will increase the speed to an average of 20-30ms, which is a significant difference.
You can sign up for Cloudfront using the tab in the AWS Management Console:

7. Set up CloudFront (Optional/Recommended)
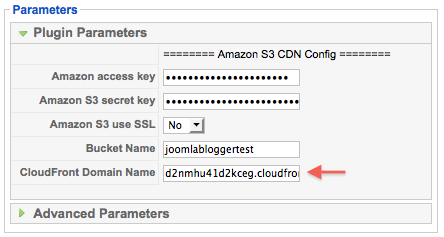
Once you have enabled CloudFront on your account, you need to create a Distribution from the CloudFront Management Console. You will create the distribution for the bucket that you previously created, and the Delivery Method will need to be set to Download. (Setting up a CNAME is not recommended at this time, as it does not support https requests.)
Once created, Amazon will create a unique Domain Name for your distribution.

You will need to copy this domain name as is to the 'CloudFront' option in the plugin parameters.
Setting up a cron job
You now need to set up a cron job. This is something you should ask your hosting provider to do for you.
However, many hosting don't provide an adequate Cron function, and you are better off using an external Cron service like EasyCron or similar.
For general information about setting up a cron job, see the Wikipedia article on Cron. For information regarding your hosting provider, visit your hosting provider’s FAQ or manual pages.
Note to Windows Users: There are similar programs to cron available if your host runs Windows. VisualCron, Cron for Windows and pycron are all examples. Consult these projects' documentation for further information.
1. Change the Cron Job URL Parameter from the Advanced Parameters to something unique for your website. This cron job URL should be accessed at least once a day, but it all depends on the cache lifetimes that you set up.
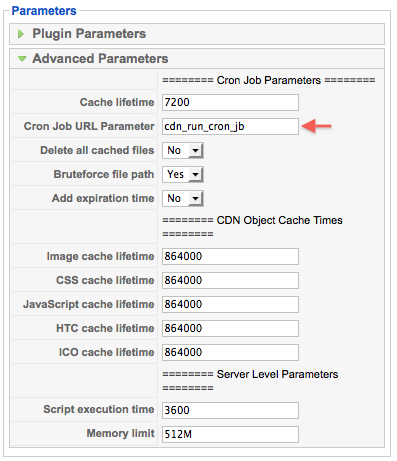
2. Set up a UNIX cron job to have your server periodically view your cron job URL using a command-line HTTP agent like wget, curl or GET. The command to execute will look like this:
wget -N http://example.com/?cdn_run_cron
Where “cdn_run_cron” is the URL parameter that you set. If you use a different program than wget, substitute that program and its arguments for wget in this line.
If you don't know how to set up a cron job, talk to your hosting company, they will be able to set it up easily.
3. Enable the plugin
After you have set up the cron job, you can enable the plugin using the plugin manager.
4. Browse to your cron job URL
Once the plugin is enabled, browse to your cron job URL manually, this will create the necessary database tables.
5. Browse your site
You can then browse through as many pages on your website as you can. This will cache all of the pages to the server.
6. Visit the cron job URL
When you are done, visit the cron job URL again. This will push all of the files over to the CDN. As files get pushed over, the new URLs of the files will be displayed when browsing your website. As time goes on, people that use your website will visit new pages, and new files will be found every time that the cron job runs. Those files will be pushed to the CDN and then the new URL of the file will be displayed in the source code of your HTML pages.
That's it - your site will now be able to use Amazon servers for content distribution.
Important note about server time
I had trouble getting the syncronization to Amazon S3 to work with my server. After much back and forth the corePHP support guys found that my server had the incorrect time. It turns out my server had gotten an incorrect time after a reboot the day before. This caused the sync with the Amazon S3 bucket to fail, as the time difference was too large. Make sure your server time is correct to avoid this.
How to set up JA Amazon S3 Component for Joomla!
I haven't tested this extension myself, but the below video will show you how to set it up.
Which solution to choose?
From what I've heard, Amazon is a cheaper solution for smaller sites. That means jomCDN from corephp or the JA Amazon S3 Component from JoomlArt will be a better choice.
If your site is large (in the Terrabyte traffic range), the CDN for Joomla extension from nonumber.nl might be better.
I chose jomCDN for my site, and I think it works well. I already had an account with Amazon, so the signup process was very easy to do.
More about CDN
The capacity sum of strategically placed servers can be higher than the network backbone capacity. This can result in an impressive increase in the number of concurrent users. For instance, when there is a 10 Gbit/s network backbone and 100 Gbit/s central server capacity, only 10 Gbit/s can be delivered. But when 10 servers are moved to 10 edge locations, total capacity can be 10×10 Gbit/s.
Strategically placed edge servers decrease the load on interconnects, public peers, private peers and backbones, freeing up capacity and lowering delivery costs. It uses the same principle as above. Instead of loading all traffic on a backbone or peer link, a CDN can offload these by redirecting traffic to edge servers.
Incorporating a CDN with your website provides you with several benefits, including the following:
- Faster Page Loads - Since most of your files will be served from a much closer location to your end-users, the speed in which your page loads will be greatly increased.
- Reduced Server Load - Since most of your files are no longer served by your own host, your server will be freed up to perform the basic tasks required of it.
- Handle More Visitors - Because of the improvements just mentioned and other factors, your website will be able to handle the strain of a much larger user base that it could otherwise.
- Higher SEO Rankings - Caused by the increase in performance to your site, something Google recently claimed effects SEO rankings.
CDN for Joomla uses Pull Zones
CDN for Joomla! is made to work with any CDN system that supports Pull Zones.
A Pull Zone works in a way that you do not have to upload any media. The Pull Zone uploads the media to the CDN servers as soon as it is required. Read more on Pull Zones here: http://wiki.netdna.com/FAQ/Pull_Zones
Location of data centres
Below, I've listed some links for you to see where some of the providers keep their centres:
I hope this post has inspired you to take a look at the CDN solutions available for Joomla. I won't use it for every site I build, but I definitely will use jomCDN for some of the sites that have an international audience.
TIP: If you don't want to do the setup of this plug-in yourself, ask these guys for help.

 is a system of computers containing copies of data, placed at various points in a network so as to maximize bandwidth for access to the data from clients throughout the network. A client accesses a copy of the data near to the client, as opposed to all clients accessing the same central server, so as to avoid bottleneck near that server.
Content types include web objects, download-able objects (media files, software, documents), applications, real time media streams, and other components of internet delivery (DNS, routes, and database queries).
There are currently three main CDN extensions available for Joomla, and I've just installed one on this site. I'm happy with the result - I hope you notice the difference in speed! In this post, I'll look at what CDN is, take a look at two different CDN extensions for Joomla and how to set up CDN using jomCDN from corephp.
)